Other Side of the River


Start Small:
Creating an Urban Homestead
Meditate on Your Space
Before diving into your projects, take the time to meditate on your space. How do you see yourself using that space? Create realistic expectations and take advantage of what you are already given. Then start small and gradually expand. This will allow you to learn the basics and gain confidence in your abilities.
Build a Greenhouse and Planter Boxes
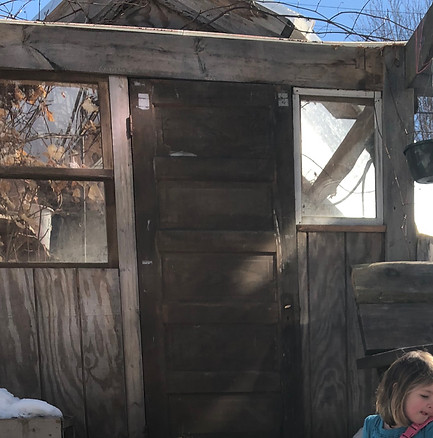
Greenhouse Exterior
We attached it to our garage. We had a wood-burning stove and electric in our garage so we used a portable heater and burned wood when we could, so we were able to keep the greenhouse warm. Once we were successful, we redid the greenhouse to make it bigger. This is a picture of our second greenhouse.
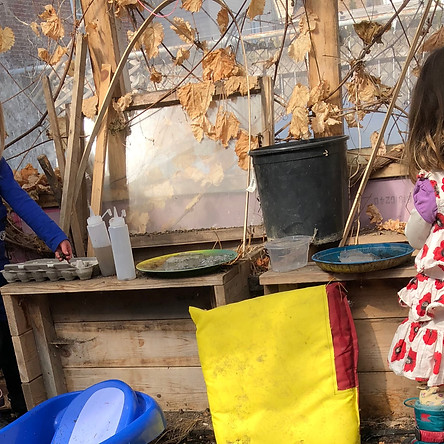
Greenhouse Interior
This was the inside with repurposed windows and salvaged insulation. You can also see some of the planter boxes we built and outdoor pillows I sewed with waterproof fabric.
When we started gardening, we used pots. This allowed us to follow the sun and once we figured out what grew well and where, we started making planter boxes. We moved those around as well; it's just more difficult.
Use what you have and involve the whole family


Pear Tree
We were blessed with a mature fruit- bearing pear tree when we moved in. My husband maintained the tree and I spearheaded the processing.
At times, the tree got really messy with the bees, but that was only when we did not remember to pick up the fallen fruit!
We also had a raspberry bush that we would pick every morning and freeze the berries on a tray. We made raspberry bakery and jam! Our yard was so tiny, but you don't need much space to grow food.
Involve the kids
Our kids were involved in gardening, harvesting the pears and raspberries, and processing the food. They ate much of our harvest fresh and enjoyed learning how food is grown. They also helped with the fruit leathers, juicing, and bakery.
I am excited to expand their knowledge in our new place with more land to grow. Goats and chickens will be added to our fruit and vegetable harvest.
Invest in supplies and create systems that will make you successful

Compost
I was really disgusted with composting at first. It was dirty and smelly and intimidating. We kept our compost in the freezer to begin with because I did not want to see or smell it. I have seen people keep it under their kitchen sink as well if you want to keep it hidden.
Now we keep it on our counter in a big metal container. If it's on the counter, we use it more often which gives us the best soil!
Plenty of times we have vegetables and fruit grow back from the compost. It's really exciting to see what will come back each year and it makes it easier when we are starting our garden.
Once your compost is full, empty it into a garbage can outside and stir it. We are working on a compost tumbler, so that will make things even easier.
Can, Freeze, and Dehydrate
Invest in a chest freezer, food dehydrator, and canning supplies. If you are going to start preserving some of your own food, you need the tools to do it.
We found a chest freezer on craigslist, bought a really nice food dehydrator (but a small one would have been fine) and canning supplies.
Remember to start small! You do not need to can hundreds of jars at first, ten jars are plenty and more manageable when just starting out!
Be Resourceful, Get Creative, and Learn from Others
Be Resourceful and Get Creative
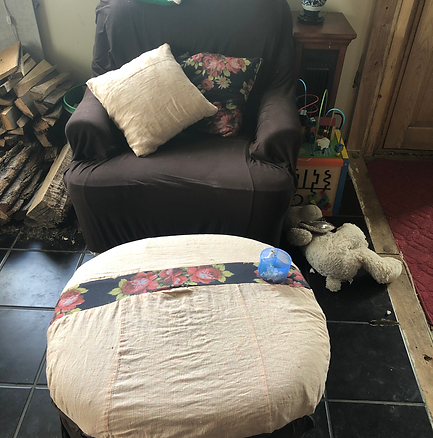
Make the most of what you have and find creative solutions to challenges. Look for ways to repurpose materials and save things if you can. When our furniture started ripping, I found covers for them. I used old fabric and a sheet to create a cover for the ottoman. I had extra stuffing from an our king-sized pillow and was able to make decorative pillows to give our ratty furniture a new look. If you are able to repurpose materials and get creative, you can save money for the bigger projects!

Share Your Journey and Ask questions
Visit other homesteads and community gardens. Ask questions. Chat up farmers at the markets. See what you can learn and discover what interests you. Just by talking to people with similar interests, we have learned so much about how to start with chickens and goats.
Consider Alternate Heating Sources
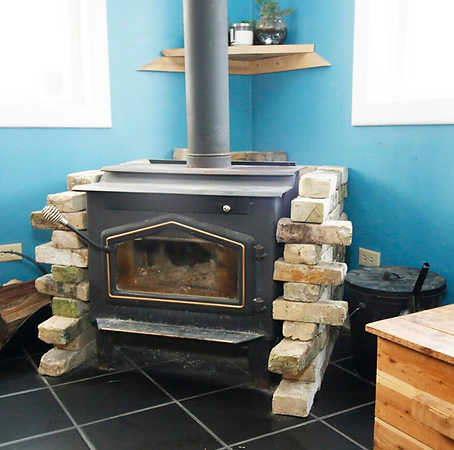
Get a Wood Burning Stove
I disliked our wood burner at first. It seemed like such a hassle to start a fire. We were already so busy with three little kids, our jobs, and other projects. But once I learned how to start a fire, I changed my mind. It was a fun thing to do with my kids. They would help bring in the wood, find the kindling, and help me adjust the pieces just right before I started the fire. The heat kept our whole addition warm and prevented our furnace from having to work overtime on the really cold days. I love how our wet wintery clothes dried quickly when placed near the stove. It saved me from having to put anything like that in the dryer.
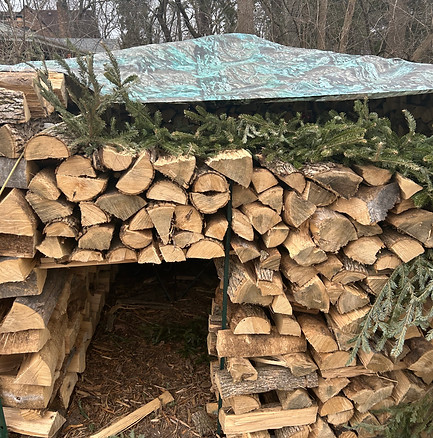
Establish a Firewood Storage System
At our bungalow in Riverwest, we stored our firewood along the wall in the garage. Because we have more space in River Hills, we decided to build a fort out of firewood. It will be awhile before we need to use this wood regularly, so we wanted it to serve more than one purpose. The kids can play in here while our wood stays dry. Drive posts into the ground and stack the wood carefully to secure it in place. Create doors and windows by strategically placing longer boards among the firewood. The kids decorated this fort with our old Christmas tree and moved some camp chairs inside.